

02 Oct 4 ways to change the capture date on digital photos
When organising digital photo collections for clients, I more often than not, organise the photo collection into Year > Month folders using the date/time taken stamp embedded into each digital file’s metadata.
However, I always come across files where the date/time stamp is missing or incorrect.
The date/time stamp can be missing if a file was received via a social sharing app such as WhatsApp (which removes the file metadata on sending for privacy and security reasons) or the date could be incorrect if the image was captured on a digital camera where the date wasn’t set and the date defaults to something like 01-01-2004 at 12:00am.
The other time that dates are incorrect on a digital image, is when you scan old photographs, slides or negatives, the date taken data will reflect the date scanned, not the date the photograph was originally taken.
It can also happen when photos are taken in a different time zone. I remember when I travelled to Hawaii, and travelled across the international date line, the photos I took at the airport in Sydney were dated after the photos I took the morning I arrived in Hawaii. Which really messes with the chronological camera roll!
Here are four ways you can change the date/time taken data for a digital file:
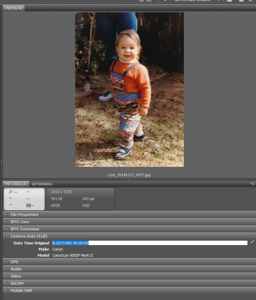
Using Adobe Bridge
We have previously written about Adobe Bridge, and how it is a great FREE digital photo viewing and metadata editing tool for both MAC and Windows computers. This program is great because it reads the files from their original location, and makes any changes to the original files, without importing the files into the program (as Apple Photos does).
In the metadata screen, you can change the Date/Time taken next to the field Date Time Original under Camera Data (exif). You can also batch change dates by selecting multiple files and changing the date the same way for a group of images.
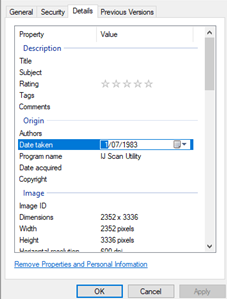
Using File Explorer (Windows)
To change the date on a Windows computer using File Explorer, simply find the file, right click > Properties. Click on the Details tab and update the date under Origin > Date Taken. Again, you can batch change the dates by selecting multiple files and following the same steps.
Using Apple Photos
In the Apple Photos app, you can update the date/time taken by selecting a file(s), the going to Image > Adjust Date and Time. Please note, any changes or edits you make to your images in the Apple Photos program, does not transfer out of the program if you export the original images from the Photos program.
On your iPhone
iOS15 for iPhone has some neat new features for Photos. One of these is the ability to adjust the date and time of an image in the Photos app on your iPhone. Open an image in the Photos app, press the (i) button at the bottom of the screen and more information about the image will appear, including the date taken. Hit Adjust to change the date and time.
However, just like changing this in the Photos app on your iMac or Mac laptop, these changes are only made within the Photos app, so if you copy your data to another platform (e.g. Windows computer) or program, the changes you make to the date/time in your Photos app on the iPhone will not transfer across to other platforms.

If you want to learn more about using Adobe Bridge to organise your digital photos, check out this short course: Organizing Photos with Adobe Bridge by Adam Pratt.
Have a magical day!
Sorry, the comment form is closed at this time.